
Reliable Emergency Lighting Solutions
Prioritise safety in your building with our comprehensive range of emergency lighting solutions. Designed to provide a clear path to safety during power outages or other emergencies, these essential fixtures are a critical component of any building's safety system. Our collection includes a wide variety of products, from highly visible emergency exit signs to durable emergency bulkheads and recessed downlights, ensuring every area of your space is covered.
Our lighting solutions are built for reliability and compliance. Each product is engineered to meet stringent safety regulations, giving you peace of mind that your building occupants are protected. Whether you need lighting for a commercial office, an industrial warehouse, or a public venue, our range offers a solution for every application.
Investing in high-quality emergency lighting is a smart, non-negotiable step for any business owner or facilities manager. It not only meets legal requirements but also demonstrates a commitment to the well-being of everyone on your premises. Browse our selection and find the dependable lighting you need to keep your building safe at all times.
Original price
£12.86
Original price
£12.86
-
Original price
£12.86
Original price
£12.86
Current price
£9.16
Exc VAT
Current price
£10.99
Inc VAT
£10.99
-
£10.99
Current price
£10.99
Inc VAT
£10.99
-
£10.99
Exc VAT
Current price
£10.99
Exc VAT
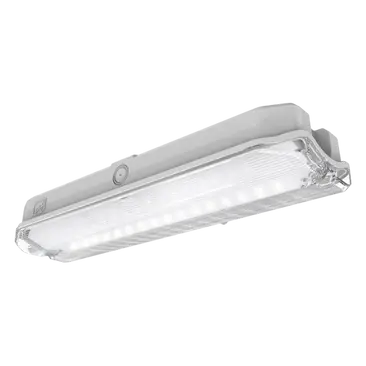
Ansell AGLED/3M Guardian IP65 3W LED Emergency Bulkhead Maintained/Non-Maintained White
Availability:
IN STOCK
Ansell AGLED/3M Guardian IP65 3W LED Emergency Bulkhead Maintained/Non-Maintained White Ultra-slim profile LED polycarbonate bulkhead. Features Ul...
View full details
Original price
£12.86
Original price
£12.86
-
Original price
£12.86
Original price
£12.86
Current price
£9.16
Exc VAT
Current price
£10.99
Inc VAT
£10.99
-
£10.99
Current price
£10.99
Inc VAT
£10.99
-
£10.99
Exc VAT
Current price
£10.99
Exc VAT

Original price
£24.13
-
Original price
£24.13
Original price
£20.11
Exc VAT
£24.13
Inc VAT
£24.13
-
£24.13
Current price
£24.13
Inc VAT
£24.13
-
£24.13
Exc VAT
Current price
£24.13
Exc VAT

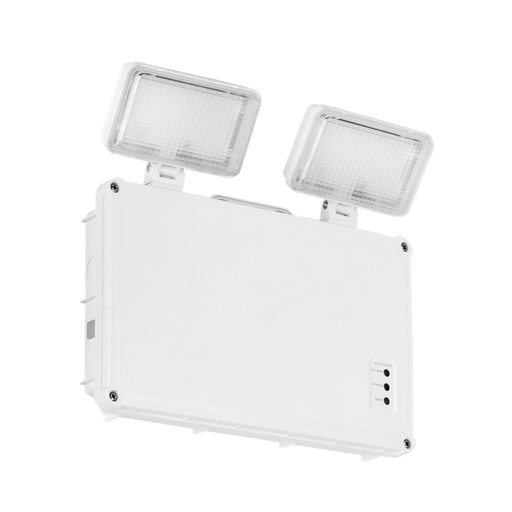
Integral ILEMTS033 4.5W IP20 Twinspot 6500K Maintained or Non-Maintained Self Test 400 Lumens
Availability:
IN STOCK
Integral ILEMTS033 4.5W IP20 Twinspot 6500K Maintained or Non-Maintained Self Test 400 Lumens Product Description Our new comprehensive Twin Spot ...
View full details
Original price
£24.13
-
Original price
£24.13
Original price
£20.11
Exc VAT
£24.13
Inc VAT
£24.13
-
£24.13
Current price
£24.13
Inc VAT
£24.13
-
£24.13
Exc VAT
Current price
£24.13
Exc VAT
Original price
£77.09
Original price
£77.09
-
Original price
£77.09
Original price
£77.09
Current price
£64.09
Exc VAT
Current price
£76.91
Inc VAT
£76.91
-
£76.91
Current price
£76.91
Inc VAT
£76.91
-
£76.91
Exc VAT
Current price
£76.91
Exc VAT
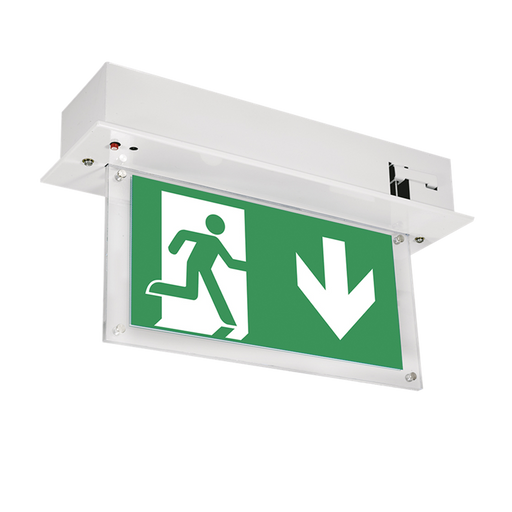
Aurora EN-EMLED24ST 240V 3.3W LED 1/2/3/8h Recessed Emergency Exit Sign without Legend
Availability:
Dispatch in 1-2 Days
Aurora EN-EMLED24ST 240V 3.3W LED 1/2/3/8h Recessed Emergency Exit Sign without Legend Product Description Range of maintained and non-maintained...
View full details
Original price
£77.09
Original price
£77.09
-
Original price
£77.09
Original price
£77.09
Current price
£64.09
Exc VAT
Current price
£76.91
Inc VAT
£76.91
-
£76.91
Current price
£76.91
Inc VAT
£76.91
-
£76.91
Exc VAT
Current price
£76.91
Exc VAT

Original price
£40.61
-
Original price
£40.61
Original price
£33.84
Exc VAT
£40.61
Inc VAT
£40.61
-
£40.61
Current price
£40.61
Inc VAT
£40.61
-
£40.61
Exc VAT
Current price
£40.61
Exc VAT
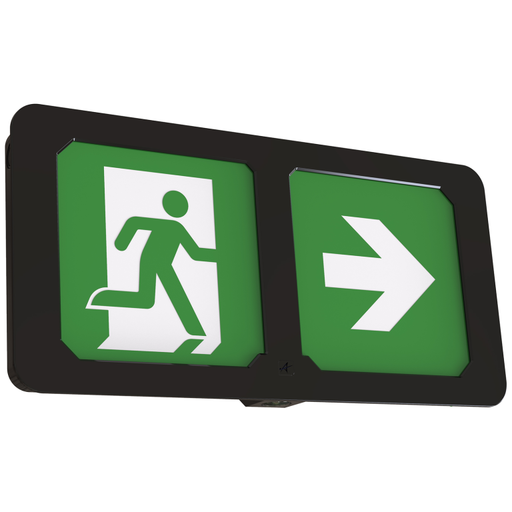
Collingwood EMBX35M Salvus Emergency Exit Box IP20 3.5W 6500K 50lm Manual-Test
Availability:
Dispatch in 1-2 Days
Collingwood EMBX35M Emergency Exit Box 50lm Viewing Distance 35m Manual Test. Product Description Collingwood's range of emergency boxes contain t...
View full details
Original price
£40.61
-
Original price
£40.61
Original price
£33.84
Exc VAT
£40.61
Inc VAT
£40.61
-
£40.61
Current price
£40.61
Inc VAT
£40.61
-
£40.61
Exc VAT
Current price
£40.61
Exc VAT

Original price
£57.68
-
Original price
£57.68
Original price
£48.07
Exc VAT
£57.68
Inc VAT
£57.68
-
£57.68
Current price
£57.68
Inc VAT
£57.68
-
£57.68
Exc VAT
Current price
£57.68
Exc VAT
Collingwood EMBL30S Salvus Emergency Exit Blade IP20 4W 6500K 50lm Self-Test
Availability:
Dispatch in 1-2 Days
Collingwood EMBL30S Salvus Emergency Exit Blade IP20 4W 6500K 50lm Self-Test Product Description Collingwood's range of emergency blades contain t...
View full details
Original price
£57.68
-
Original price
£57.68
Original price
£48.07
Exc VAT
£57.68
Inc VAT
£57.68
-
£57.68
Current price
£57.68
Inc VAT
£57.68
-
£57.68
Exc VAT
Current price
£57.68
Exc VAT
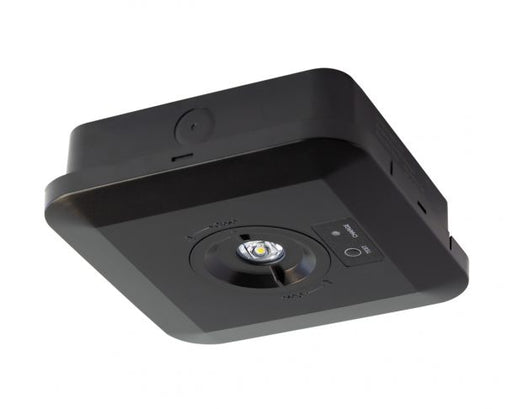 Collingwood EMSBSQEM Salvus Surface Emergency Spot 2W 6500K Square Black, Manual-Test, Open Corridor
Original price
£131.57
Original price
£131.57
-
Original price
£131.57
Original price
£131.57
Current price
£22.08
Exc VAT
Current price
£26.50
Inc VAT
£26.50
-
£26.50
Current price
£26.50
Inc VAT
£26.50
-
£26.50
Exc VAT
Current price
£26.50
Exc VAT
Collingwood EMSBSQEM Salvus Surface Emergency Spot 2W 6500K Square Black, Manual-Test, Open Corridor
Availability:
IN STOCK
Collingwood EMSBSQEM Salvus Surface Emergency Spot 2W 6500K Square Black, Manual-Test, Open Corridor Product Description Collingwood's new emergen...
View full details
Original price
£131.57
Original price
£131.57
-
Original price
£131.57
Original price
£131.57
Current price
£22.08
Exc VAT
Current price
£26.50
Inc VAT
£26.50
-
£26.50
Current price
£26.50
Inc VAT
£26.50
-
£26.50
Exc VAT
Current price
£26.50
Exc VAT

Original price
£131.57
Original price
£131.57
-
Original price
£131.57
Original price
£131.57
Current price
£20.83
Exc VAT
Current price
£25.00
Inc VAT
£25.00
-
£25.00
Current price
£25.00
Inc VAT
£25.00
-
£25.00
Exc VAT
Current price
£25.00
Exc VAT
Collingwood EMSWRDEM Salvus Surface Emergency Spot 2W 6500K Round White, Manual-Test, Open Corridor
Availability:
IN STOCK
Collingwood EMSWRDEM Salvus Surface Emergency Spot 2W 6500K Round White, Manual-Test, Open Corridor Product Description Collingwood's new emergenc...
View full details
Original price
£131.57
Original price
£131.57
-
Original price
£131.57
Original price
£131.57
Current price
£20.83
Exc VAT
Current price
£25.00
Inc VAT
£25.00
-
£25.00
Current price
£25.00
Inc VAT
£25.00
-
£25.00
Exc VAT
Current price
£25.00
Exc VAT
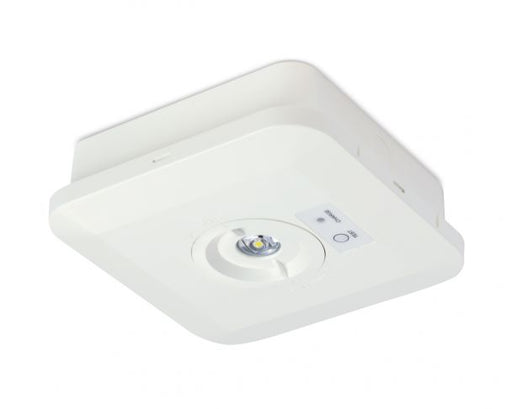 Collingwood EMSWSQEM Salvus Surface Emergency Spot 2W 6500K Square White, Manual-Test, Open Corridor
Original price
£131.57
Original price
£131.57
-
Original price
£131.57
Original price
£131.57
Current price
£22.10
Exc VAT
Current price
£26.52
Inc VAT
£26.52
-
£26.52
Current price
£26.52
Inc VAT
£26.52
-
£26.52
Exc VAT
Current price
£26.52
Exc VAT
Collingwood EMSWSQEM Salvus Surface Emergency Spot 2W 6500K Square White, Manual-Test, Open Corridor
Availability:
IN STOCK
Collingwood EMSWSQEM Salvus Surface Emergency Spot 2W 6500K Square White, Manual-Test, Open Corridor Product Description Collingwood's new emergen...
View full details
Original price
£131.57
Original price
£131.57
-
Original price
£131.57
Original price
£131.57
Current price
£22.10
Exc VAT
Current price
£26.52
Inc VAT
£26.52
-
£26.52
Current price
£26.52
Inc VAT
£26.52
-
£26.52
Exc VAT
Current price
£26.52
Exc VAT

Original price
£27.58
-
Original price
£27.58
Original price
£22.98
Exc VAT
£27.58
Inc VAT
£27.58
-
£27.58
Current price
£27.58
Inc VAT
£27.58
-
£27.58
Exc VAT
Current price
£27.58
Exc VAT
Collingwood EMRBST Salvus Route Emergency Spot 1W 6500K Black, Self-Test, Open Corridor Lens
Availability:
Dispatch in 1-2 Days
Collingwood EMRBST Salvus Route Emergency Spot 1W 6500K Black, Self-Test, Open Corridor Lens Product Description Collingwood's new range of emerge...
View full details
Original price
£27.58
-
Original price
£27.58
Original price
£22.98
Exc VAT
£27.58
Inc VAT
£27.58
-
£27.58
Current price
£27.58
Inc VAT
£27.58
-
£27.58
Exc VAT
Current price
£27.58
Exc VAT
 Ansell AENC/1/SG Encore IP20 3W LED Emergency Exit Box Maintained/Non-Maintained Lithium Silver Grey
Original price
£31.60
Original price
£31.60
-
Original price
£31.60
Original price
£31.60
Current price
£25.54
Exc VAT
Current price
£30.65
Inc VAT
£30.65
-
£30.65
Current price
£30.65
Inc VAT
£30.65
-
£30.65
Exc VAT
Current price
£30.65
Exc VAT
Ansell AENC/1/SG Encore IP20 3W LED Emergency Exit Box Maintained/Non-Maintained Lithium Silver Grey
Availability:
Dispatch in 2-5 Days
Ansell AENC/1/SG Encore IP20 3W LED Emergency Exit Box Maintained/Non-Maintained Lithium Silver Grey Ultra slim modern LED exit box with LiFePO4 Li...
View full details
Original price
£31.60
Original price
£31.60
-
Original price
£31.60
Original price
£31.60
Current price
£25.54
Exc VAT
Current price
£30.65
Inc VAT
£30.65
-
£30.65
Current price
£30.65
Inc VAT
£30.65
-
£30.65
Exc VAT
Current price
£30.65
Exc VAT

Original price
£98.99
Original price
£98.99
-
Original price
£98.99
Original price
£98.99
Current price
£45.58
Exc VAT
Current price
£54.70
Inc VAT
£54.70
-
£54.70
Current price
£54.70
Inc VAT
£54.70
-
£54.70
Exc VAT
Current price
£54.70
Exc VAT
Collingwood EMBMAX Salvus Max High Output Emergency Bulkhead Manual Test, 6-10W, IP66
Availability:
Dispatch in 1-2 Days
Collingwood EMBMAX Salvus Max High Output Emergency Bulkhead Manual Test, 6-10W, IP66 Product Description Salvus max is the perfect solution for a...
View full details
Original price
£98.99
Original price
£98.99
-
Original price
£98.99
Original price
£98.99
Current price
£45.58
Exc VAT
Current price
£54.70
Inc VAT
£54.70
-
£54.70
Current price
£54.70
Inc VAT
£54.70
-
£54.70
Exc VAT
Current price
£54.70
Exc VAT

Original price
£45.68
Original price
£45.68
-
Original price
£45.68
Original price
£45.68
Current price
£34.27
Exc VAT
Current price
£41.12
Inc VAT
£41.12
-
£41.12
Current price
£41.12
Inc VAT
£41.12
-
£41.12
Exc VAT
Current price
£41.12
Exc VAT
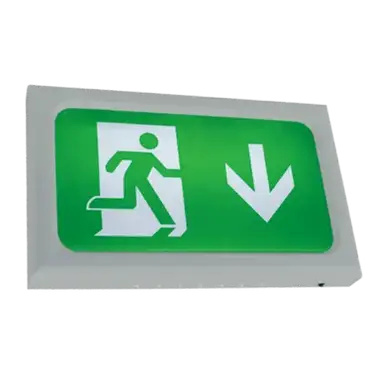
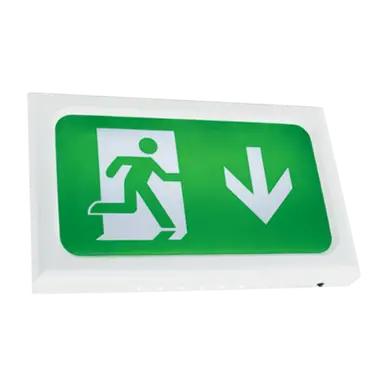
Aurora EN-EMBL 220-240V 4W LED Manual Test Wall/Ceiling Emergency Exit Sign
Availability:
Dispatch in 1-2 Days
Aurora EN-EMBL 220-240V 4W LED Manual Test Wall/Ceiling Emergency Exit Sign Product Description The new Emergency Drop Down Exit Blade is maintai...
View full details
Original price
£45.68
Original price
£45.68
-
Original price
£45.68
Original price
£45.68
Current price
£34.27
Exc VAT
Current price
£41.12
Inc VAT
£41.12
-
£41.12
Current price
£41.12
Inc VAT
£41.12
-
£41.12
Exc VAT
Current price
£41.12
Exc VAT

Original price
£56.05
-
Original price
£56.05
Original price
£46.71
Exc VAT
£56.05
Inc VAT
£56.05
-
£56.05
Current price
£56.05
Inc VAT
£56.05
-
£56.05
Exc VAT
Current price
£56.05
Exc VAT
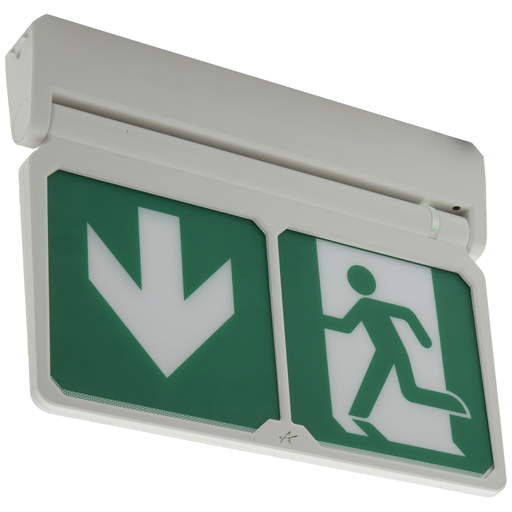
Aurora EN-EMBLST 220-240V 4W LED Self Test Wall/Ceiling Emergency Exit Sign
Availability:
Dispatch in 1-2 Days
Aurora EN-EMBLST 220-240V 4W LED Self Test Wall/Ceiling Emergency Exit Sign Product Description The new Emergency Drop Down Exit Blade is maintai...
View full details
Original price
£56.05
-
Original price
£56.05
Original price
£46.71
Exc VAT
£56.05
Inc VAT
£56.05
-
£56.05
Current price
£56.05
Inc VAT
£56.05
-
£56.05
Exc VAT
Current price
£56.05
Exc VAT

Original price
£37.07
-
Original price
£37.07
Original price
£30.89
Exc VAT
£37.07
Inc VAT
£37.07
-
£37.07
Current price
£37.07
Inc VAT
£37.07
-
£37.07
Exc VAT
Current price
£37.07
Exc VAT
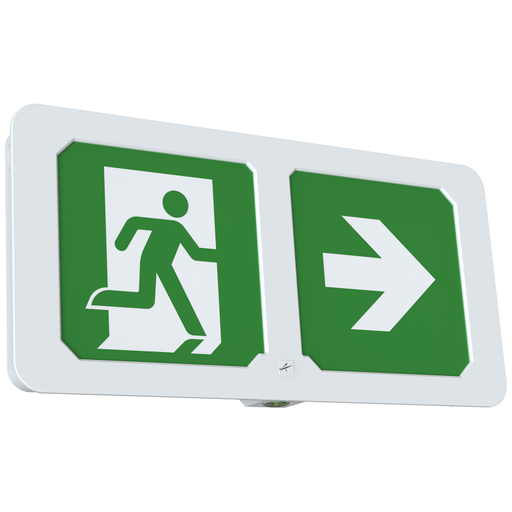
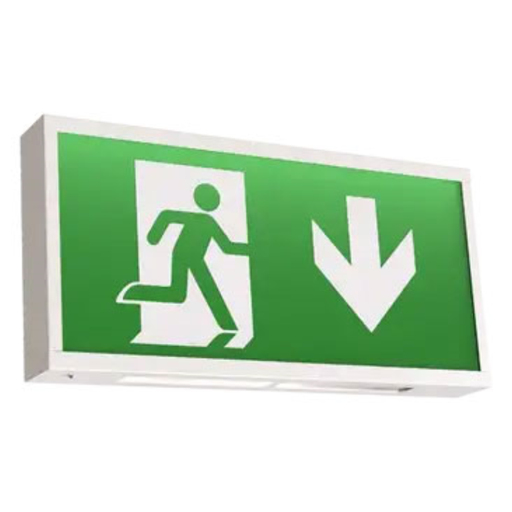
Aurora EN-EMSL 220-240V 3W LED Wall Emergency Exit Sign
Availability:
Dispatch in 1-2 Days
Aurora EN-EMSL 220-240V 3W LED Wall Emergency Exit Sign Product Description The new Emergency Wall Mounted Slim Exit Box offers 3 hours emergency...
View full details
Original price
£37.07
-
Original price
£37.07
Original price
£30.89
Exc VAT
£37.07
Inc VAT
£37.07
-
£37.07
Current price
£37.07
Inc VAT
£37.07
-
£37.07
Exc VAT
Current price
£37.07
Exc VAT

Original price
£42.04
-
Original price
£42.04
Original price
£35.03
Exc VAT
£42.04
Inc VAT
£42.04
-
£42.04
Current price
£42.04
Inc VAT
£42.04
-
£42.04
Exc VAT
Current price
£42.04
Exc VAT
Aurora EN-EMSLST 220-240V 3W LED Self Test Wall Emergency Exit Sign
Availability:
Dispatch in 1-2 Days
Aurora EN-EMSLST 220-240V 3W LED Self Test Wall Emergency Exit Sign Product Description The new Emergency Wall Mounted Slim Exit Box offers 3 hou...
View full details
Original price
£42.04
-
Original price
£42.04
Original price
£35.03
Exc VAT
£42.04
Inc VAT
£42.04
-
£42.04
Current price
£42.04
Inc VAT
£42.04
-
£42.04
Exc VAT
Current price
£42.04
Exc VAT
Original price
£48.92
-
Original price
£48.92
Original price
£40.77
Exc VAT
£48.92
Inc VAT
£48.92
-
£48.92
Current price
£48.92
Inc VAT
£48.92
-
£48.92
Exc VAT
Current price
£48.92
Exc VAT
Aurora EN-EMTSST 220-240V 2x2.5W LED IP65 Self Test Twin Spot Emergency Light
Availability:
Dispatch in 1-2 Days
Aurora EN-EMTSST 220-240V 2x2.5W LED IP65 Self Test Twin Spot Emergency Light Product Description The new Emergency Twin Spot offers 3 hours emer...
View full details
Original price
£48.92
-
Original price
£48.92
Original price
£40.77
Exc VAT
£48.92
Inc VAT
£48.92
-
£48.92
Current price
£48.92
Inc VAT
£48.92
-
£48.92
Exc VAT
Current price
£48.92
Exc VAT

Original price
£29.65
-
Original price
£29.65
Original price
£24.71
Exc VAT
£29.65
Inc VAT
£29.65
-
£29.65
Current price
£29.65
Inc VAT
£29.65
-
£29.65
Exc VAT
Current price
£29.65
Exc VAT
Aurora EN-EMBHST 3.7W IP65 IK10 LED Emergency Bulkhead with Exit Sign Self Test
Availability:
Dispatch in 1-2 Days
Aurora EN-EMBHST 3.7W IP65 IK10 LED Emergency Bulkhead with Exit Sign Self Test Product Description The new Emergency Surface Mount Bulkhead now ...
View full details
Original price
£29.65
-
Original price
£29.65
Original price
£24.71
Exc VAT
£29.65
Inc VAT
£29.65
-
£29.65
Current price
£29.65
Inc VAT
£29.65
-
£29.65
Exc VAT
Current price
£29.65
Exc VAT

Original price
£25.56
Original price
£25.56
-
Original price
£25.56
Original price
£25.56
Current price
£20.70
Exc VAT
Current price
£24.84
Inc VAT
£24.84
-
£24.84
Current price
£24.84
Inc VAT
£24.84
-
£24.84
Exc VAT
Current price
£24.84
Exc VAT
Ansell ASLED/3NM Signal IP20 1.5W LED Emergency Downlight 6500K Non-Maintained White
Availability:
IN STOCK
Ansell ASLED/3NM Signal 6500K LED 3NM Emergency D/Light Product Description Economic and compact LED Non-Maintained fixed downlight ideal for use ...
View full details
Original price
£25.56
Original price
£25.56
-
Original price
£25.56
Original price
£25.56
Current price
£20.70
Exc VAT
Current price
£24.84
Inc VAT
£24.84
-
£24.84
Current price
£24.84
Inc VAT
£24.84
-
£24.84
Exc VAT
Current price
£24.84
Exc VAT
Original price
£39.52
Original price
£39.52
-
Original price
£39.52
Original price
£39.52
Current price
£32.02
Exc VAT
Current price
£38.42
Inc VAT
£38.42
-
£38.42
Current price
£38.42
Inc VAT
£38.42
-
£38.42
Exc VAT
Current price
£38.42
Exc VAT
Ansell AADLSE/W Adler IP20 2W Slim LED Emergency Exit Box Maintained/Non-Maintained White
Availability:
Dispatch in 2-5 Days
Ansell AADLSE/W Adler Slim Exit Box White Product Description Rotatable legends to reduce waste and increase flexibility Rotatable legends to redu...
View full details
Original price
£39.52
Original price
£39.52
-
Original price
£39.52
Original price
£39.52
Current price
£32.02
Exc VAT
Current price
£38.42
Inc VAT
£38.42
-
£38.42
Current price
£38.42
Inc VAT
£38.42
-
£38.42
Exc VAT
Current price
£38.42
Exc VAT
Original price
£34.76
Original price
£34.76
-
Original price
£34.76
Original price
£34.76
Current price
£28.15
Exc VAT
Current price
£33.78
Inc VAT
£33.78
-
£33.78
Current price
£33.78
Inc VAT
£33.78
-
£33.78
Exc VAT
Current price
£33.78
Exc VAT
Ansell AADL/3M/W Adler IP20 2W LED Emergency Exit Sign Maintained/Non-Maintained White
Availability:
Dispatch in 2-5 Days
Ansell AADL/3M/W Adler Exit Sign Maintained/Non-Maintained White Product Description Light weight contemporary Ansell design, multiple install opt...
View full details
Original price
£34.76
Original price
£34.76
-
Original price
£34.76
Original price
£34.76
Current price
£28.15
Exc VAT
Current price
£33.78
Inc VAT
£33.78
-
£33.78
Current price
£33.78
Inc VAT
£33.78
-
£33.78
Exc VAT
Current price
£33.78
Exc VAT

Original price
£52.09
Original price
£52.09
-
Original price
£52.09
Original price
£52.09
Current price
£27.50
Exc VAT
Current price
£33.00
Inc VAT
£33.00
-
£33.00
Current price
£33.00
Inc VAT
£33.00
-
£33.00
Exc VAT
Current price
£33.00
Exc VAT
Integral ILEMBH030 High Bay Emergency Bulkhead IP65 10/15W 1000/1500Lm 3Hr Maintained or Non-Maintained 6500K Manual Test
Availability:
Dispatch in 2-3 Days
Integral ILEMBH030 High Bay Emergency Bulkhead IP65 10/15W 1000/1500Lm 3Hr Maintained or Non-Maintained 6500K Manual Test Product Description The I...
View full details
Original price
£52.09
Original price
£52.09
-
Original price
£52.09
Original price
£52.09
Current price
£27.50
Exc VAT
Current price
£33.00
Inc VAT
£33.00
-
£33.00
Current price
£33.00
Inc VAT
£33.00
-
£33.00
Exc VAT
Current price
£33.00
Exc VAT

Original price
£60.42
-
Original price
£60.42
Original price
£50.35
Exc VAT
£60.42
Inc VAT
£60.42
-
£60.42
Current price
£60.42
Inc VAT
£60.42
-
£60.42
Exc VAT
Current price
£60.42
Exc VAT
Integral ILEMBH031 High Bay Emergency Bulkhead IP65 10/15W 1000/1500Lm 3Hr Maintained or Non-Maintained 6500K Self Test
Availability:
Dispatch in 2-3 Days
Integral ILEMBH031 High Bay Emergency Bulkhead IP65 10/15W 1000/1500Lm 3Hr Maintained or Non-Maintained 6500K Self Test Product Description The Int...
View full details
Original price
£60.42
-
Original price
£60.42
Original price
£50.35
Exc VAT
£60.42
Inc VAT
£60.42
-
£60.42
Current price
£60.42
Inc VAT
£60.42
-
£60.42
Exc VAT
Current price
£60.42
Exc VAT

Original price
£35.41
-
Original price
£35.41
Original price
£29.51
Exc VAT
£35.41
Inc VAT
£35.41
-
£35.41
Current price
£35.41
Inc VAT
£35.41
-
£35.41
Exc VAT
Current price
£35.41
Exc VAT
Ovia OVEM10210WHST 2.8W LED Circular Emerg Ceiling Light St
Ovia
Availability:
Dispatch in 2-3 Days
Ovia OVEM10210WHST 2.8W LED Circular Emerg Ceiling Light St Product Description Data Sheet: Click Here for Data Sheet
Original price
£35.41
-
Original price
£35.41
Original price
£29.51
Exc VAT
£35.41
Inc VAT
£35.41
-
£35.41
Current price
£35.41
Inc VAT
£35.41
-
£35.41
Exc VAT
Current price
£35.41
Exc VAT

Original price
£35.41
-
Original price
£35.41
Original price
£29.51
Exc VAT
£35.41
Inc VAT
£35.41
-
£35.41
Current price
£35.41
Inc VAT
£35.41
-
£35.41
Exc VAT
Current price
£35.41
Exc VAT
Ovia OVEM12210WHST 2.8W LED Square Emerg Ceiling Light St
Ovia
Availability:
Dispatch in 2-3 Days
Ovia OVEM12210WHST 2.8W LED Square Emerg Ceiling Light St Product Description Data Sheet: Click Here for Data Sheet
Original price
£35.41
-
Original price
£35.41
Original price
£29.51
Exc VAT
£35.41
Inc VAT
£35.41
-
£35.41
Current price
£35.41
Inc VAT
£35.41
-
£35.41
Exc VAT
Current price
£35.41
Exc VAT

Original price
£36.50
-
Original price
£36.50
Original price
£30.42
Exc VAT
£36.50
Inc VAT
£36.50
-
£36.50
Current price
£36.50
Inc VAT
£36.50
-
£36.50
Exc VAT
Current price
£36.50
Exc VAT
Ovia OEE3-ST 3W LED IP20 Maintained Emergency Box St
Ovia
Availability:
Dispatch in 2-3 Days
Ovia OEE3-ST 3W LED IP20 Maintained Emergency Box St Product Description Data Sheet: Click Here for Data Sheet
Original price
£36.50
-
Original price
£36.50
Original price
£30.42
Exc VAT
£36.50
Inc VAT
£36.50
-
£36.50
Current price
£36.50
Inc VAT
£36.50
-
£36.50
Exc VAT
Current price
£36.50
Exc VAT

Original price
£55.27
-
Original price
£55.27
Original price
£46.06
Exc VAT
£55.27
Inc VAT
£55.27
-
£55.27
Current price
£55.27
Inc VAT
£55.27
-
£55.27
Exc VAT
Current price
£55.27
Exc VAT
Ovia OEN6-ST 2W LED IP65 Nm Emerg Twin Spot St
Ovia
Availability:
Dispatch in 2-3 Days
Ovia OEN6-ST 2W LED IP65 Nm Emerg Twin Spot St Product Description Data Sheet: Click Here for Data Sheet
Original price
£55.27
-
Original price
£55.27
Original price
£46.06
Exc VAT
£55.27
Inc VAT
£55.27
-
£55.27
Current price
£55.27
Inc VAT
£55.27
-
£55.27
Exc VAT
Current price
£55.27
Exc VAT

Original price
£43.73
-
Original price
£43.73
Original price
£36.44
Exc VAT
£43.73
Inc VAT
£43.73
-
£43.73
Current price
£43.73
Inc VAT
£43.73
-
£43.73
Exc VAT
Current price
£43.73
Exc VAT
Ovia OEN6 2 X 3W LED IP65 Nm Emerg Twin Spot
Ovia
Availability:
Dispatch in 2-3 Days
Ovia OEN6 2 X 3W LED IP65 Nm Emerg Twin Spot Product Description Data Sheet: Click Here for Data Sheet
Original price
£43.73
-
Original price
£43.73
Original price
£36.44
Exc VAT
£43.73
Inc VAT
£43.73
-
£43.73
Current price
£43.73
Inc VAT
£43.73
-
£43.73
Exc VAT
Current price
£43.73
Exc VAT

Original price
£92.87
Original price
£92.87
-
Original price
£92.87
Original price
£92.87
Current price
£51.46
Exc VAT
Current price
£61.75
Inc VAT
£61.75
-
£61.75
Current price
£61.75
Inc VAT
£61.75
-
£61.75
Exc VAT
Current price
£61.75
Exc VAT
Collingwood EMBMAXST Salvus Max High Output Emergency Bulkhead Self-Test, 6-10W, IP66
Availability:
Dispatch in 1-2 Days
Collingwood EMBMAXST Salvus Max High Output Emergency Bulkhead Self-Test, 6-10W, IP66 Product Description Salvus max is the perfect solution for a...
View full details
Original price
£92.87
Original price
£92.87
-
Original price
£92.87
Original price
£92.87
Current price
£51.46
Exc VAT
Current price
£61.75
Inc VAT
£61.75
-
£61.75
Current price
£61.75
Inc VAT
£61.75
-
£61.75
Exc VAT
Current price
£61.75
Exc VAT
Original price
£30.68
-
Original price
£30.68
Original price
£25.57
Exc VAT
£30.68
Inc VAT
£30.68
-
£30.68
Current price
£30.68
Inc VAT
£30.68
-
£30.68
Exc VAT
Current price
£30.68
Exc VAT
Ansell AENC/2/W Encore IP20 2.5W LED Emergency Exit Box Self-Test Maintained/Non-Maintained Lithium White
Availability:
Dispatch in 2-5 Days
Ansell AENC/2/W Encore IP20 2.5W LED Emergency Exit Box Self-Test Maintained/Non-Maintained Lithium White Ultra slim modern LED exit box with LiFeP...
View full details
Original price
£30.68
-
Original price
£30.68
Original price
£25.57
Exc VAT
£30.68
Inc VAT
£30.68
-
£30.68
Current price
£30.68
Inc VAT
£30.68
-
£30.68
Exc VAT
Current price
£30.68
Exc VAT
Original price
£27.10
Original price
£27.10
-
Original price
£27.10
Original price
£27.10
Current price
£21.90
Exc VAT
Current price
£26.28
Inc VAT
£26.28
-
£26.28
Current price
£26.28
Inc VAT
£26.28
-
£26.28
Exc VAT
Current price
£26.28
Exc VAT
Ansell AWAT/1 Watchman Lithium Exit Box Maintained / Non-Maintained
Availability:
Dispatch in 2-5 Days
Ansell AWAT/1 Watchman Lithium Exit Box Maintained / Non-Maintained *Please note - With every purchase of this emergency box, you can select one of...
View full details
Original price
£27.10
Original price
£27.10
-
Original price
£27.10
Original price
£27.10
Current price
£21.90
Exc VAT
Current price
£26.28
Inc VAT
£26.28
-
£26.28
Current price
£26.28
Inc VAT
£26.28
-
£26.28
Exc VAT
Current price
£26.28
Exc VAT

Original price
£77.92
-
Original price
£77.92
Original price
£64.93
Exc VAT
£77.92
Inc VAT
£77.92
-
£77.92
Current price
£77.92
Inc VAT
£77.92
-
£77.92
Exc VAT
Current price
£77.92
Exc VAT
Ansell AADL/3M/B/DM3 Adler Exit Sign EM DALI Black
Availability:
Dispatch in 7-10 Days
Ansell AADL/3M/B/DM3 Adler Exit Sign EM DALI Black Light weight contemporary Ansell design, multiple install options LED Exit Sign Rotatable le...
View full details
Original price
£77.92
-
Original price
£77.92
Original price
£64.93
Exc VAT
£77.92
Inc VAT
£77.92
-
£77.92
Current price
£77.92
Inc VAT
£77.92
-
£77.92
Exc VAT
Current price
£77.92
Exc VAT

Original price
£36.38
Original price
£36.38
-
Original price
£36.38
Original price
£36.38
Current price
£29.48
Exc VAT
Current price
£35.37
Inc VAT
£35.37
-
£35.37
Current price
£35.37
Inc VAT
£35.37
-
£35.37
Exc VAT
Current price
£35.37
Exc VAT
Ansell AADL/3M/BLK Adler Exit Sign - Black
Availability:
IN STOCK
Ansell AADL/3M/BLK Adler Exit Sign - Black Light weight contemporary Ansell design, multiple install options LED Exit Sign Rotatable legends to...
View full details
Original price
£36.38
Original price
£36.38
-
Original price
£36.38
Original price
£36.38
Current price
£29.48
Exc VAT
Current price
£35.37
Inc VAT
£35.37
-
£35.37
Current price
£35.37
Inc VAT
£35.37
-
£35.37
Exc VAT
Current price
£35.37
Exc VAT
Original price
£41.36
Original price
£41.36
-
Original price
£41.36
Original price
£41.36
Current price
£33.51
Exc VAT
Current price
£40.21
Inc VAT
£40.21
-
£40.21
Current price
£40.21
Inc VAT
£40.21
-
£40.21
Exc VAT
Current price
£40.21
Exc VAT
Ansell AADLSE/BLK Adler Slim Exit Box Black
Availability:
Dispatch in 2-5 Days
Ansell AADLSE/BLK Adler Slim Exit Box Black Rotatable legends to reduce waste and increase flexibility Rotatable legends to reduce waste and in...
View full details
Original price
£41.36
Original price
£41.36
-
Original price
£41.36
Original price
£41.36
Current price
£33.51
Exc VAT
Current price
£40.21
Inc VAT
£40.21
-
£40.21
Current price
£40.21
Inc VAT
£40.21
-
£40.21
Exc VAT
Current price
£40.21
Exc VAT

Original price
£55.08
-
Original price
£55.08
Original price
£45.90
Exc VAT
£55.08
Inc VAT
£55.08
-
£55.08
Current price
£55.08
Inc VAT
£55.08
-
£55.08
Exc VAT
Current price
£55.08
Exc VAT
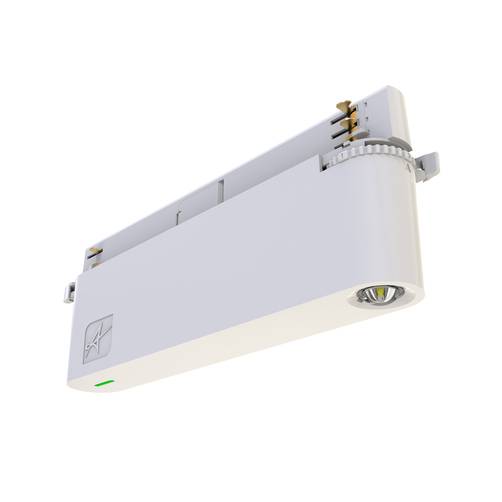
Ansell ALEG/P3/1/NM/B 3W Legion Emergency Three Circuit Trackspot Black
Availability:
Dispatch in 2-3 Days
Ansell ALEG/P3/1/NM/B 3W Legion Emergency Three Circuit Trackspot - Black Product Overview Introducing the Ansell ALEG/P3/1/NM/B 3W Legion Emergenc...
View full details
Original price
£55.08
-
Original price
£55.08
Original price
£45.90
Exc VAT
£55.08
Inc VAT
£55.08
-
£55.08
Current price
£55.08
Inc VAT
£55.08
-
£55.08
Exc VAT
Current price
£55.08
Exc VAT

Original price
£83.91
-
Original price
£83.91
Original price
£69.93
Exc VAT
£83.91
Inc VAT
£83.91
-
£83.91
Current price
£83.91
Inc VAT
£83.91
-
£83.91
Exc VAT
Current price
£83.91
Exc VAT
Ansell ALEG/P3/1/NM/B/DA 3W Legion Emergency Three Circuit Trackspot DALI Black
Availability:
Dispatch in 2-3 Days
Ansell ALEG/P3/1/NM/B/DA 3W Legion Emergency Three Circuit Trackspot DALI - Black Product Overview Introducing the Ansell ALEG/P3/1/NM/B/DA 3W Legi...
View full details
Original price
£83.91
-
Original price
£83.91
Original price
£69.93
Exc VAT
£83.91
Inc VAT
£83.91
-
£83.91
Current price
£83.91
Inc VAT
£83.91
-
£83.91
Exc VAT
Current price
£83.91
Exc VAT
Original price
£55.08
-
Original price
£55.08
Original price
£45.90
Exc VAT
£55.08
Inc VAT
£55.08
-
£55.08
Current price
£55.08
Inc VAT
£55.08
-
£55.08
Exc VAT
Current price
£55.08
Exc VAT
Ansell ALEG/P3/1/NM/W 3W Legion Emergency Three Circuit Trackspot White
Availability:
Dispatch in 2-3 Days
Ansell ALEG/P3/1/NM/W 3W Legion Emergency Three Circuit Trackspot - White Product Overview Introducing the Ansell ALEG/P3/1/NM/W 3W Legion Emergenc...
View full details
Original price
£55.08
-
Original price
£55.08
Original price
£45.90
Exc VAT
£55.08
Inc VAT
£55.08
-
£55.08
Current price
£55.08
Inc VAT
£55.08
-
£55.08
Exc VAT
Current price
£55.08
Exc VAT

Original price
£83.91
-
Original price
£83.91
Original price
£69.93
Exc VAT
£83.91
Inc VAT
£83.91
-
£83.91
Current price
£83.91
Inc VAT
£83.91
-
£83.91
Exc VAT
Current price
£83.91
Exc VAT
Ansell ALEG/P3/1/NM/W/DA 3W Legion Emergency Three Circuit Trackspot DALI White
Availability:
Dispatch in 2-3 Days
Ansell ALEG/P3/1/NM/W/DA 3W Legion Emergency Three Circuit Trackspot DALI - White Product Overview Introducing the Ansell ALEG/P3/1/NM/W/DA 3W Legi...
View full details
Original price
£83.91
-
Original price
£83.91
Original price
£69.93
Exc VAT
£83.91
Inc VAT
£83.91
-
£83.91
Current price
£83.91
Inc VAT
£83.91
-
£83.91
Exc VAT
Current price
£83.91
Exc VAT

Original price
£10.07
Original price
£10.07
-
Original price
£10.07
Original price
£10.07
Current price
£6.57
Exc VAT
Current price
£7.88
Inc VAT
£7.88
-
£7.88
Current price
£7.88
Inc VAT
£7.88
-
£7.88
Exc VAT
Current price
£7.88
Exc VAT

BELL 09140 Spectrum Genesis 2W LED Small Emergency Bulkhead
Availability:
Dispatch in 2-3 Days
BELL 09140 Spectrum Genesis 2W LED Small Emergency Bulkhead The BELL Spectrum Genesis 09140 2W LED Small Emergency Bulkhead is a high-pe...
View full details
Original price
£10.07
Original price
£10.07
-
Original price
£10.07
Original price
£10.07
Current price
£6.57
Exc VAT
Current price
£7.88
Inc VAT
£7.88
-
£7.88
Current price
£7.88
Inc VAT
£7.88
-
£7.88
Exc VAT
Current price
£7.88
Exc VAT

Original price
£13.43
Original price
£13.43
-
Original price
£13.43
Original price
£13.43
Current price
£8.76
Exc VAT
Current price
£10.51
Inc VAT
£10.51
-
£10.51
Current price
£10.51
Inc VAT
£10.51
-
£10.51
Exc VAT
Current price
£10.51
Exc VAT
BELL 09141 Spectrum Genesis 2W LED Large Emergency Bulkhead
Availability:
IN STOCK
BELL 09141 Spectrum Genesis 2W LED Large Emergency Bulkhead The BELL Spectrum Genesis 09141 2W LED Large Emergency Bulkhead offers a dep...
View full details
Original price
£13.43
Original price
£13.43
-
Original price
£13.43
Original price
£13.43
Current price
£8.76
Exc VAT
Current price
£10.51
Inc VAT
£10.51
-
£10.51
Current price
£10.51
Inc VAT
£10.51
-
£10.51
Exc VAT
Current price
£10.51
Exc VAT

Original price
£30.18
-
Original price
£30.18
Original price
£25.15
Exc VAT
£30.18
Inc VAT
£30.18
-
£30.18
Current price
£30.18
Inc VAT
£30.18
-
£30.18
Exc VAT
Current price
£30.18
Exc VAT
Ovia OBKS3C-B 2.5W LED IP40 Circular Non-Maintained Emergency Self-Test Enable/Disable Ceiling Light - 6500K - Black
Ovia
Availability:
Dispatch in 2-3 Days
Ovia OBKS3C-B 2.5W LED IP40 Circular Non-Maintained Emergency Self-Test Enable/Disable Ceiling Light - 6500K - Black Product Description Data Shee...
View full details
Original price
£30.18
-
Original price
£30.18
Original price
£25.15
Exc VAT
£30.18
Inc VAT
£30.18
-
£30.18
Current price
£30.18
Inc VAT
£30.18
-
£30.18
Exc VAT
Current price
£30.18
Exc VAT

Original price
£30.18
-
Original price
£30.18
Original price
£25.15
Exc VAT
£30.18
Inc VAT
£30.18
-
£30.18
Current price
£30.18
Inc VAT
£30.18
-
£30.18
Exc VAT
Current price
£30.18
Exc VAT
Ovia OBKS3C-W 2.5W LED IP40 Circular Non-Maintained Emergency Self-Test Enable/Disable Ceiling Light - 6500K - White
Ovia
Availability:
Dispatch in 2-3 Days
Ovia OBKS3C-W 2.5W LED IP40 Circular Non-Maintained Emergency Self-Test Enable/Disable Ceiling Light - 6500K - White Product Description Data Shee...
View full details
Original price
£30.18
-
Original price
£30.18
Original price
£25.15
Exc VAT
£30.18
Inc VAT
£30.18
-
£30.18
Current price
£30.18
Inc VAT
£30.18
-
£30.18
Exc VAT
Current price
£30.18
Exc VAT

Original price
£30.18
-
Original price
£30.18
Original price
£25.15
Exc VAT
£30.18
Inc VAT
£30.18
-
£30.18
Current price
£30.18
Inc VAT
£30.18
-
£30.18
Exc VAT
Current price
£30.18
Exc VAT
Ovia OBKS3S-B 2.5W LED IP40 Square Non-Maintained Emergency Self-Test Enable/Disable Ceiling Light - 6500K - Black
Ovia
Availability:
Dispatch in 2-3 Days
Ovia OBKS3S-B 2.5W LED IP40 Square Non-Maintained Emergency Self-Test Enable/Disable Ceiling Light - 6500K - Black Product Description Data Sheet:...
View full details
Original price
£30.18
-
Original price
£30.18
Original price
£25.15
Exc VAT
£30.18
Inc VAT
£30.18
-
£30.18
Current price
£30.18
Inc VAT
£30.18
-
£30.18
Exc VAT
Current price
£30.18
Exc VAT

Original price
£30.18
-
Original price
£30.18
Original price
£25.15
Exc VAT
£30.18
Inc VAT
£30.18
-
£30.18
Current price
£30.18
Inc VAT
£30.18
-
£30.18
Exc VAT
Current price
£30.18
Exc VAT
Ovia OBKS3S-W 2.5W LED IP40 Square Non-Maintained Emergency Self-Test Enable/Disable Ceiling Light - 6500K - White
Ovia
Availability:
Dispatch in 2-3 Days
Ovia OBKS3S-W 2.5W LED IP40 Square Non-Maintained Emergency Self-Test Enable/Disable Ceiling Light - 6500K - White Product Description Data Sheet:...
View full details
Original price
£30.18
-
Original price
£30.18
Original price
£25.15
Exc VAT
£30.18
Inc VAT
£30.18
-
£30.18
Current price
£30.18
Inc VAT
£30.18
-
£30.18
Exc VAT
Current price
£30.18
Exc VAT

Original price
£40.82
-
Original price
£40.82
Original price
£34.02
Exc VAT
£40.82
Inc VAT
£40.82
-
£40.82
Current price
£40.82
Inc VAT
£40.82
-
£40.82
Exc VAT
Current price
£40.82
Exc VAT
Ovia OVEM11311WHLST 3W LED 3W LED IP20 Self-Test Maintained Emergency Exit Box- Left Legend - 6500K - White
Ovia
Availability:
Dispatch in 2-3 Days
Ovia OVEM11311WHLST 3W LED 3W LED IP20 Self-Test Maintained Emergency Exit Box - White - Left Legend Product Description Data Sheet: Click Here fo...
View full details
Original price
£40.82
-
Original price
£40.82
Original price
£34.02
Exc VAT
£40.82
Inc VAT
£40.82
-
£40.82
Current price
£40.82
Inc VAT
£40.82
-
£40.82
Exc VAT
Current price
£40.82
Exc VAT

Original price
£40.82
-
Original price
£40.82
Original price
£34.02
Exc VAT
£40.82
Inc VAT
£40.82
-
£40.82
Current price
£40.82
Inc VAT
£40.82
-
£40.82
Exc VAT
Current price
£40.82
Exc VAT
Ovia OVEM11311WHRST 3W LED 3W LED IP20 Self-Test Maintained Emergency Exit Box- Right Legend - 6500K - White
Ovia
Availability:
Dispatch in 2-3 Days
Ovia OVEM11311WHRST 3W LED 3W LED IP20 Self-Test Maintained Emergency Exit Box - White - Right Legend Product Description Data Sheet: Click Here f...
View full details
Original price
£40.82
-
Original price
£40.82
Original price
£34.02
Exc VAT
£40.82
Inc VAT
£40.82
-
£40.82
Current price
£40.82
Inc VAT
£40.82
-
£40.82
Exc VAT
Current price
£40.82
Exc VAT

Original price
£28.66
-
Original price
£28.66
Original price
£23.88
Exc VAT
£28.66
Inc VAT
£28.66
-
£28.66
Current price
£28.66
Inc VAT
£28.66
-
£28.66
Exc VAT
Current price
£28.66
Exc VAT
Ovia OBKE2-B 2W LED IP40 Maintained Emergency Self-Test Enable/Disable Exit Box - All 4 Legends Supplied - 6500K - Black
Ovia
Availability:
Dispatch in 2-3 Days
Ovia OBKE2-B 2W LED IP40 Maintained Emergency Self-Test Enable/Disable Exit Box - All 4 Legends Supplied - 6500K - Black Product Description Data ...
View full details
Original price
£28.66
-
Original price
£28.66
Original price
£23.88
Exc VAT
£28.66
Inc VAT
£28.66
-
£28.66
Current price
£28.66
Inc VAT
£28.66
-
£28.66
Exc VAT
Current price
£28.66
Exc VAT

Original price
£28.66
-
Original price
£28.66
Original price
£23.88
Exc VAT
£28.66
Inc VAT
£28.66
-
£28.66
Current price
£28.66
Inc VAT
£28.66
-
£28.66
Exc VAT
Current price
£28.66
Exc VAT
Ovia OBKE2-W 2W LED IP40 Maintained Emergency Self-Test Enable/Disable Exit Box - All 4 Legends Supplied - 6500K - White
Ovia
Availability:
IN STOCK
Ovia OBKE2-W 2W LED IP40 Maintained Emergency Self-Test Enable/Disable Exit Box - All 4 Legends Supplied - 6500K - White Product Description Data ...
View full details
Original price
£28.66
-
Original price
£28.66
Original price
£23.88
Exc VAT
£28.66
Inc VAT
£28.66
-
£28.66
Current price
£28.66
Inc VAT
£28.66
-
£28.66
Exc VAT
Current price
£28.66
Exc VAT
 Ovia OBKN2-B 2W LED IP65 Non-Maintained Emergency Self-Test Enable/Disable Twin Spot - 6500K - Black
Original price
£37.78
-
Original price
£37.78
Original price
£31.48
Exc VAT
£37.78
Inc VAT
£37.78
-
£37.78
Current price
£37.78
Inc VAT
£37.78
-
£37.78
Exc VAT
Current price
£37.78
Exc VAT
Ovia OBKN2-B 2W LED IP65 Non-Maintained Emergency Self-Test Enable/Disable Twin Spot - 6500K - Black
Ovia
Availability:
Dispatch in 2-3 Days
Ovia OBKN2-B 2W LED IP65 Non-Maintained Emergency Self-Test Enable/Disable Twin Spot - 6500K - Black Product Description Data Sheet: Click Here fo...
View full details
Original price
£37.78
-
Original price
£37.78
Original price
£31.48
Exc VAT
£37.78
Inc VAT
£37.78
-
£37.78
Current price
£37.78
Inc VAT
£37.78
-
£37.78
Exc VAT
Current price
£37.78
Exc VAT