
Commercial Lighting


Original price
£373.68
-
Original price
£373.68
Original price
£311.40
Exc VAT
£373.68
Inc VAT
£373.68
-
£373.68
Current price
£373.68
Inc VAT
£373.68
-
£373.68
Exc VAT
Current price
£373.68
Exc VAT
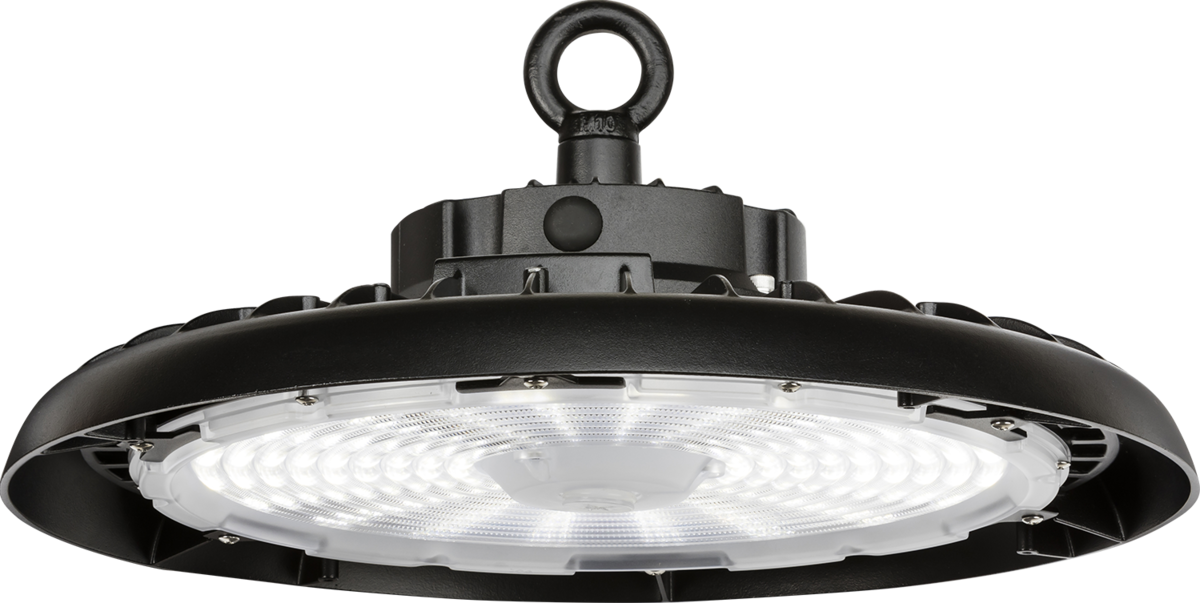
Ansell AZLEDPLUS/3/DL/MWS/M3 Z LED PLUS High Bay 3 150W 6000K MWS EM
Availability:
Dispatch in 7-10 Days
Ansell AZLEDPLUS/3/DL/MWS/M3 Z LED PLUS High Bay 3 150W 6000K MWS EM Industry leading super high efficiency (200 lm/W minimum) robust LED low/h...
View full details
Original price
£373.68
-
Original price
£373.68
Original price
£311.40
Exc VAT
£373.68
Inc VAT
£373.68
-
£373.68
Current price
£373.68
Inc VAT
£373.68
-
£373.68
Exc VAT
Current price
£373.68
Exc VAT

Original price
£256.74
-
Original price
£256.74
Original price
£213.95
Exc VAT
£256.74
Inc VAT
£256.74
-
£256.74
Current price
£256.74
Inc VAT
£256.74
-
£256.74
Exc VAT
Current price
£256.74
Exc VAT
Ansell AZLEDPLUS/3/DL/MWS Z LED PLUS High Bay 3 150W 6000K MWS
Availability:
Dispatch in 7-10 Days
Ansell AZLEDPLUS/3/DL/MWS Z LED PLUS High Bay 3 150W 6000K MWS Industry leading super high efficiency (200 lm/W minimum) robust LED low/high ba...
View full details
Original price
£256.74
-
Original price
£256.74
Original price
£213.95
Exc VAT
£256.74
Inc VAT
£256.74
-
£256.74
Current price
£256.74
Inc VAT
£256.74
-
£256.74
Exc VAT
Current price
£256.74
Exc VAT

Original price
£310.81
-
Original price
£310.81
Original price
£259.01
Exc VAT
£310.81
Inc VAT
£310.81
-
£310.81
Current price
£310.81
Inc VAT
£310.81
-
£310.81
Exc VAT
Current price
£310.81
Exc VAT
Ansell AZLEDPLUS/3/DL/M3 Z LED PLUS High Bay 3 150W 6000K EM
Availability:
Dispatch in 7-10 Days
Ansell AZLEDPLUS/3/DL/M3 Z LED PLUS High Bay 3 150W 6000K EM Industry leading super high efficiency (200 lm/W minimum) robust LED low/high bay ...
View full details
Original price
£310.81
-
Original price
£310.81
Original price
£259.01
Exc VAT
£310.81
Inc VAT
£310.81
-
£310.81
Current price
£310.81
Inc VAT
£310.81
-
£310.81
Exc VAT
Current price
£310.81
Exc VAT

Original price
£402.12
-
Original price
£402.12
Original price
£335.10
Exc VAT
£402.12
Inc VAT
£402.12
-
£402.12
Current price
£402.12
Inc VAT
£402.12
-
£402.12
Exc VAT
Current price
£402.12
Exc VAT
Ansell AZLEDPLUS/2/DL/OCTO/M3 Z LED PLUS High Bay 2 115W 6000K OCTO EM
Availability:
Dispatch in 7-10 Days
Ansell AZLEDPLUS/2/DL/OCTO/M3 Z LED PLUS High Bay 2 115W 6000K OCTO EM Industry leading super high efficiency (200 lm/W minimum) robust LED low...
View full details
Original price
£402.12
-
Original price
£402.12
Original price
£335.10
Exc VAT
£402.12
Inc VAT
£402.12
-
£402.12
Current price
£402.12
Inc VAT
£402.12
-
£402.12
Exc VAT
Current price
£402.12
Exc VAT

Original price
£285.17
-
Original price
£285.17
Original price
£237.64
Exc VAT
£285.17
Inc VAT
£285.17
-
£285.17
Current price
£285.17
Inc VAT
£285.17
-
£285.17
Exc VAT
Current price
£285.17
Exc VAT
Ansell AZLEDPLUS/2/DL/OCTO Z LED PLUS High Bay 2 115W 6000K OCTO
Availability:
Dispatch in 7-10 Days
Ansell AZLEDPLUS/2/DL/OCTO Z LED PLUS High Bay 2 115W 6000K OCTO Industry leading super high efficiency (200 lm/W minimum) robust LED low/high ...
View full details
Original price
£285.17
-
Original price
£285.17
Original price
£237.64
Exc VAT
£285.17
Inc VAT
£285.17
-
£285.17
Current price
£285.17
Inc VAT
£285.17
-
£285.17
Exc VAT
Current price
£285.17
Exc VAT

Original price
£350.09
-
Original price
£350.09
Original price
£291.74
Exc VAT
£350.09
Inc VAT
£350.09
-
£350.09
Current price
£350.09
Inc VAT
£350.09
-
£350.09
Exc VAT
Current price
£350.09
Exc VAT
Ansell AZLEDPLUS/2/DL/MWS/M3 Z LED PLUS High Bay 2 115W 6000K MWS EM
Availability:
Dispatch in 7-10 Days
Ansell AZLEDPLUS/2/DL/MWS/M3 Z LED PLUS High Bay 2 115W 6000K MWS EM Industry leading super high efficiency (200 lm/W minimum) robust LED low/h...
View full details
Original price
£350.09
-
Original price
£350.09
Original price
£291.74
Exc VAT
£350.09
Inc VAT
£350.09
-
£350.09
Current price
£350.09
Inc VAT
£350.09
-
£350.09
Exc VAT
Current price
£350.09
Exc VAT

Original price
£233.15
-
Original price
£233.15
Original price
£194.29
Exc VAT
£233.15
Inc VAT
£233.15
-
£233.15
Current price
£233.15
Inc VAT
£233.15
-
£233.15
Exc VAT
Current price
£233.15
Exc VAT
Ansell AZLEDPLUS/2/DL/MWS Z LED PLUS High Bay 2 115W 6000K MWS
Availability:
Dispatch in 7-10 Days
Ansell AZLEDPLUS/2/DL/MWS Z LED PLUS High Bay 2 115W 6000K MWS Industry leading super high efficiency (200 lm/W minimum) robust LED low/high ba...
View full details
Original price
£233.15
-
Original price
£233.15
Original price
£194.29
Exc VAT
£233.15
Inc VAT
£233.15
-
£233.15
Current price
£233.15
Inc VAT
£233.15
-
£233.15
Exc VAT
Current price
£233.15
Exc VAT

Original price
£287.21
-
Original price
£287.21
Original price
£239.34
Exc VAT
£287.21
Inc VAT
£287.21
-
£287.21
Current price
£287.21
Inc VAT
£287.21
-
£287.21
Exc VAT
Current price
£287.21
Exc VAT
Ansell AZLEDPLUS/2/DL/M3 Z LED PLUS High Bay 2 115W 6000K EM
Availability:
Dispatch in 7-10 Days
Ansell AZLEDPLUS/2/DL/M3 Z LED PLUS High Bay 2 115W 6000K EM Industry leading super high efficiency (200 lm/W minimum) robust LED low/high bay ...
View full details
Original price
£287.21
-
Original price
£287.21
Original price
£239.34
Exc VAT
£287.21
Inc VAT
£287.21
-
£287.21
Current price
£287.21
Inc VAT
£287.21
-
£287.21
Exc VAT
Current price
£287.21
Exc VAT

Original price
£379.17
-
Original price
£379.17
Original price
£315.98
Exc VAT
£379.17
Inc VAT
£379.17
-
£379.17
Current price
£379.17
Inc VAT
£379.17
-
£379.17
Exc VAT
Current price
£379.17
Exc VAT
Ansell AZLEDPLUS/1/DL/OCTO/M3 Z LED PLUS High Bay 1 75W 6000K OCTO EM
Availability:
Dispatch in 7-10 Days
Ansell AZLEDPLUS/1/DL/OCTO/M3 Z LED PLUS High Bay 1 75W 6000K OCTO EM Industry leading super high efficiency (200 lm/W minimum) robust LED low/...
View full details
Original price
£379.17
-
Original price
£379.17
Original price
£315.98
Exc VAT
£379.17
Inc VAT
£379.17
-
£379.17
Current price
£379.17
Inc VAT
£379.17
-
£379.17
Exc VAT
Current price
£379.17
Exc VAT

Original price
£12.49
Original price
£12.49
-
Original price
£12.49
Original price
£12.49
Current price
£9.95
Exc VAT
Current price
£11.94
Inc VAT
£11.94
-
£11.94
Current price
£11.94
Inc VAT
£11.94
-
£11.94
Exc VAT
Current price
£11.94
Exc VAT
Aurora AU-EMBH3W/65 3W IP65 LED Emergency Bulkhead with Exit Sign DualTest - Self Test & Manual 6500K
Availability:
Dispatch in 1-2 Days
Aurora AU-EMBH3W/65 3W IP65 LED Emergency Bulkhead with Exit Sign DualTest – 6500K Product Overview The Aurora AU-EMBH3W/65 L...
View full details
Original price
£12.49
Original price
£12.49
-
Original price
£12.49
Original price
£12.49
Current price
£9.95
Exc VAT
Current price
£11.94
Inc VAT
£11.94
-
£11.94
Current price
£11.94
Inc VAT
£11.94
-
£11.94
Exc VAT
Current price
£11.94
Exc VAT

Original price
£35.34
-
Original price
£35.34
Original price
£29.45
Exc VAT
£35.34
Inc VAT
£35.34
-
£35.34
Current price
£35.34
Inc VAT
£35.34
-
£35.34
Exc VAT
Current price
£35.34
Exc VAT
Aurora AU-EMTS3B/65 220-240V 3W LED IP65 Self Test Twin Spot Emergency Light 6500K Black
Availability:
Dispatch in 1-2 Days
Aurora AU-EMTS3B/65 3W IP65 Self-Test Twin Spot Emergency Light – 6500K Black The Aurora AU-EMTS3B/65 Self-Test Twin Spot Emergency Light is a du...
View full details
Original price
£35.34
-
Original price
£35.34
Original price
£29.45
Exc VAT
£35.34
Inc VAT
£35.34
-
£35.34
Current price
£35.34
Inc VAT
£35.34
-
£35.34
Exc VAT
Current price
£35.34
Exc VAT

Original price
£35.34
-
Original price
£35.34
Original price
£29.45
Exc VAT
£35.34
Inc VAT
£35.34
-
£35.34
Current price
£35.34
Inc VAT
£35.34
-
£35.34
Exc VAT
Current price
£35.34
Exc VAT
Aurora AU-EMTS3W/65 220-240V 3W LED IP65 Self Test Twin Spot Emergency Light 6500K White
Availability:
Dispatch in 1-2 Days
Aurora AU-EMTS3W/65 3W IP65 Self-Test Twin Spot Emergency Light – 6500K White The Aurora AU-EMTS3W/65 Self-Test Twin Spot Emergency Light is a re...
View full details
Original price
£35.34
-
Original price
£35.34
Original price
£29.45
Exc VAT
£35.34
Inc VAT
£35.34
-
£35.34
Current price
£35.34
Inc VAT
£35.34
-
£35.34
Exc VAT
Current price
£35.34
Exc VAT

Original price
£41.80
-
Original price
£41.80
Original price
£34.83
Exc VAT
£41.80
Inc VAT
£41.80
-
£41.80
Current price
£41.80
Inc VAT
£41.80
-
£41.80
Exc VAT
Current price
£41.80
Exc VAT
Knightsbridge ECLEMBK ECLIPSE 230V 3W 3-Circuit Track Emergency Spotlight - Matt Black
Availability:
Dispatch in 1-2 Days
Knightsbridge ECLEMBK Eclipse 230V 3W 3-Circuit Track Emergency LED Spotlight – Matt Black Product Overview The Knightsbridge ECLEMBK ...
View full details
Original price
£41.80
-
Original price
£41.80
Original price
£34.83
Exc VAT
£41.80
Inc VAT
£41.80
-
£41.80
Current price
£41.80
Inc VAT
£41.80
-
£41.80
Exc VAT
Current price
£41.80
Exc VAT

Original price
£41.80
-
Original price
£41.80
Original price
£34.83
Exc VAT
£41.80
Inc VAT
£41.80
-
£41.80
Current price
£41.80
Inc VAT
£41.80
-
£41.80
Exc VAT
Current price
£41.80
Exc VAT
Knightsbridge ECLEMW ECLIPSE 230V 3W 3-Circuit Track Emergency Spotlight - Matt White
Availability:
Dispatch in 1-2 Days
Knightsbridge ECLEMW Eclipse 230V 3W 3-Circuit Track Emergency LED Spotlight – Matt White Product Overview The Knightsbridge ECLEMW Ec...
View full details
Original price
£41.80
-
Original price
£41.80
Original price
£34.83
Exc VAT
£41.80
Inc VAT
£41.80
-
£41.80
Current price
£41.80
Inc VAT
£41.80
-
£41.80
Exc VAT
Current price
£41.80
Exc VAT

Original price
£45.15
-
Original price
£45.15
Original price
£37.63
Exc VAT
£45.15
Inc VAT
£45.15
-
£45.15
Current price
£45.15
Inc VAT
£45.15
-
£45.15
Exc VAT
Current price
£45.15
Exc VAT
Knightsbridge EMLED4DA 230V IP65 3W DALI LED Emergency Bulkhead (Maintained/Non-Maintained)
Availability:
Dispatch in 1-2 Days
Knightsbridge EMLED4DA 230V IP65 3W DALI LED Emergency Bulkhead The Knightsbridge EMLED4DA LED Emergency Bulkhead is a reliable and versatile...
View full details
Original price
£45.15
-
Original price
£45.15
Original price
£37.63
Exc VAT
£45.15
Inc VAT
£45.15
-
£45.15
Current price
£45.15
Inc VAT
£45.15
-
£45.15
Exc VAT
Current price
£45.15
Exc VAT

Original price
£48.24
-
Original price
£48.24
Original price
£40.20
Exc VAT
£48.24
Inc VAT
£48.24
-
£48.24
Current price
£48.24
Inc VAT
£48.24
-
£48.24
Exc VAT
Current price
£48.24
Exc VAT
Knightsbridge EMSWINGLT 230V IP20 Ceiling Mounted LED Emergency Exit Sign (Maintained/Non-Maintained)
Availability:
Dispatch in 1-2 Days
Knightsbridge EMSWINGLT 230V IP20 Ceiling Mounted LED Emergency Exit Sign (Maintained / Non-Maintained) Product Description The Knightsb...
View full details
Original price
£48.24
-
Original price
£48.24
Original price
£40.20
Exc VAT
£48.24
Inc VAT
£48.24
-
£48.24
Current price
£48.24
Inc VAT
£48.24
-
£48.24
Exc VAT
Current price
£48.24
Exc VAT

Original price
£61.04
-
Original price
£61.04
Original price
£50.87
Exc VAT
£61.04
Inc VAT
£61.04
-
£61.04
Current price
£61.04
Inc VAT
£61.04
-
£61.04
Exc VAT
Current price
£61.04
Exc VAT
Collingwood EMBLWMS Salvus Emergency 24M Viewing Distance Exit Sign IP20 2.5W 6500K Manual & Self-Test White
Availability:
Dispatch in 1-2 Days
Collingwood EMBLWMS Salvus Emergency Exit Sign 24m Viewing Distance – IP20, 2.5W, 6500K, Manual & Self-Test Product Description Th...
View full details
Original price
£61.04
-
Original price
£61.04
Original price
£50.87
Exc VAT
£61.04
Inc VAT
£61.04
-
£61.04
Current price
£61.04
Inc VAT
£61.04
-
£61.04
Exc VAT
Current price
£61.04
Exc VAT

Original price
£27.14
-
Original price
£27.14
Original price
£22.62
Exc VAT
£27.14
Inc VAT
£27.14
-
£27.14
Current price
£27.14
Inc VAT
£27.14
-
£27.14
Exc VAT
Current price
£27.14
Exc VAT
Ovia OBKN6C-W 2x3W LED IP20 Non-Maintained Self-Test Enable/Disable Emergency Twin Spot - 6000K - White
Ovia
Availability:
Dispatch in 2-3 Days
Ovia OBKN6C-W 2 X 3W LED IP20 Non-Maintained Self-Test Enable/Disable Emergency Twin Spot - 6000K - White Product Description Data Sheet: Click He...
View full details
Original price
£27.14
-
Original price
£27.14
Original price
£22.62
Exc VAT
£27.14
Inc VAT
£27.14
-
£27.14
Current price
£27.14
Inc VAT
£27.14
-
£27.14
Exc VAT
Current price
£27.14
Exc VAT

Original price
£27.14
-
Original price
£27.14
Original price
£22.62
Exc VAT
£27.14
Inc VAT
£27.14
-
£27.14
Current price
£27.14
Inc VAT
£27.14
-
£27.14
Exc VAT
Current price
£27.14
Exc VAT
Ovia OBKN6C-B 2x3W LED IP20 Non-Maintained Self-Test Enable/Disable Emergency Twin Spot - 6000K - Black
Ovia
Availability:
IN STOCK
Ovia OBKN6C-B 2 X 3W LED IP20 Non-Maintained Self-Test Enable/Disable Emergency Twin Spot - 6000K - Black Product Description Data Sheet: Click He...
View full details
Original price
£27.14
-
Original price
£27.14
Original price
£22.62
Exc VAT
£27.14
Inc VAT
£27.14
-
£27.14
Current price
£27.14
Inc VAT
£27.14
-
£27.14
Exc VAT
Current price
£27.14
Exc VAT
 Ovia OBKN2-B 2W LED IP65 Non-Maintained Emergency Self-Test Enable/Disable Twin Spot - 6500K - Black
Original price
£37.78
-
Original price
£37.78
Original price
£31.48
Exc VAT
£37.78
Inc VAT
£37.78
-
£37.78
Current price
£37.78
Inc VAT
£37.78
-
£37.78
Exc VAT
Current price
£37.78
Exc VAT
Ovia OBKN2-B 2W LED IP65 Non-Maintained Emergency Self-Test Enable/Disable Twin Spot - 6500K - Black
Ovia
Availability:
Dispatch in 2-3 Days
Ovia OBKN2-B 2W LED IP65 Non-Maintained Emergency Self-Test Enable/Disable Twin Spot - 6500K - Black Product Description Data Sheet: Click Here fo...
View full details
Original price
£37.78
-
Original price
£37.78
Original price
£31.48
Exc VAT
£37.78
Inc VAT
£37.78
-
£37.78
Current price
£37.78
Inc VAT
£37.78
-
£37.78
Exc VAT
Current price
£37.78
Exc VAT
 Ovia OBKN2-W 2W LED IP65 Non-Maintained Emergency Self-Test Enable/Disable Twin Spot - 6500K - White
Original price
£37.78
-
Original price
£37.78
Original price
£31.48
Exc VAT
£37.78
Inc VAT
£37.78
-
£37.78
Current price
£37.78
Inc VAT
£37.78
-
£37.78
Exc VAT
Current price
£37.78
Exc VAT
Ovia OBKN2-W 2W LED IP65 Non-Maintained Emergency Self-Test Enable/Disable Twin Spot - 6500K - White
Ovia
Availability:
Dispatch in 2-3 Days
Ovia OBKN2-W 2W LED IP65 Non-Maintained Emergency Self-Test Enable/Disable Twin Spot - 6500K - White Product Description Data Sheet: Click Here fo...
View full details
Original price
£37.78
-
Original price
£37.78
Original price
£31.48
Exc VAT
£37.78
Inc VAT
£37.78
-
£37.78
Current price
£37.78
Inc VAT
£37.78
-
£37.78
Exc VAT
Current price
£37.78
Exc VAT

Original price
£30.18
-
Original price
£30.18
Original price
£25.15
Exc VAT
£30.18
Inc VAT
£30.18
-
£30.18
Current price
£30.18
Inc VAT
£30.18
-
£30.18
Exc VAT
Current price
£30.18
Exc VAT
Ovia OBKV2-U-W 2W LED IP20 Maintained Self-Test Enable/Disable Hanging Exit Sign - Legend Up - 5500K - White
Ovia
Availability:
Dispatch in 2-3 Days
Ovia OBKV2-U-W 2W LED IP20 Maintained Self-Test Enable/Disable Hanging Exit Sign - Legend Up - 5500K - White Product Description Data Sheet: Click...
View full details
Original price
£30.18
-
Original price
£30.18
Original price
£25.15
Exc VAT
£30.18
Inc VAT
£30.18
-
£30.18
Current price
£30.18
Inc VAT
£30.18
-
£30.18
Exc VAT
Current price
£30.18
Exc VAT

Original price
£30.18
-
Original price
£30.18
Original price
£25.15
Exc VAT
£30.18
Inc VAT
£30.18
-
£30.18
Current price
£30.18
Inc VAT
£30.18
-
£30.18
Exc VAT
Current price
£30.18
Exc VAT
Ovia OBKV2-U-B 2W LED IP20 Maintained Self-Test Enable/Disable Hanging Exit Sign - Legend Up - 5500K - Black
Ovia
Availability:
IN STOCK
Ovia OBKV2-U-B 2W LED IP20 Maintained Self-Test Enable/Disable Hanging Exit Sign - Legend Up - 5500K - Black Product Description Data Sheet: Click...
View full details
Original price
£30.18
-
Original price
£30.18
Original price
£25.15
Exc VAT
£30.18
Inc VAT
£30.18
-
£30.18
Current price
£30.18
Inc VAT
£30.18
-
£30.18
Exc VAT
Current price
£30.18
Exc VAT

Original price
£30.18
-
Original price
£30.18
Original price
£25.15
Exc VAT
£30.18
Inc VAT
£30.18
-
£30.18
Current price
£30.18
Inc VAT
£30.18
-
£30.18
Exc VAT
Current price
£30.18
Exc VAT
Ovia OBKV2-LR-W 2W LED IP20 Maintained Self-Test Enable/Disable Hanging Exit Sign - Legend Left/Right - 5500K - White
Ovia
Availability:
IN STOCK
Ovia OBKV2-LR-W 2W LED IP20 Maintained Self-Test Enable/Disable Hanging Exit Sign - Legend Left/Right - 5500K - White Product Description Data She...
View full details
Original price
£30.18
-
Original price
£30.18
Original price
£25.15
Exc VAT
£30.18
Inc VAT
£30.18
-
£30.18
Current price
£30.18
Inc VAT
£30.18
-
£30.18
Exc VAT
Current price
£30.18
Exc VAT

Original price
£30.18
-
Original price
£30.18
Original price
£25.15
Exc VAT
£30.18
Inc VAT
£30.18
-
£30.18
Current price
£30.18
Inc VAT
£30.18
-
£30.18
Exc VAT
Current price
£30.18
Exc VAT
Ovia OBKV2-LR-B 2W LED IP20 Maintained Self-Test Enable/Disable Hanging Exit Sign - Legend Left/Right - 5500K - Black
Ovia
Availability:
IN STOCK
Ovia OBKV2-LR-B 2W LED IP20 Maintained Self-Test Enable/Disable Hanging Exit Sign - Legend Left/Right - 5500K - Black Product Description Data She...
View full details
Original price
£30.18
-
Original price
£30.18
Original price
£25.15
Exc VAT
£30.18
Inc VAT
£30.18
-
£30.18
Current price
£30.18
Inc VAT
£30.18
-
£30.18
Exc VAT
Current price
£30.18
Exc VAT

Original price
£30.18
-
Original price
£30.18
Original price
£25.15
Exc VAT
£30.18
Inc VAT
£30.18
-
£30.18
Current price
£30.18
Inc VAT
£30.18
-
£30.18
Exc VAT
Current price
£30.18
Exc VAT
Ovia OBKV2-D-W 2W LED IP20 Maintained Self-Test Enable/Disable Hanging Exit Sign - Legend Down - 5500K - White
Ovia
Availability:
IN STOCK
Ovia OBKV2-D-W 2W LED IP20 Maintained Self-Test Enable/Disable Hanging Exit Sign - Legend Down - 5500K - White Product Description Data Sheet: Cli...
View full details
Original price
£30.18
-
Original price
£30.18
Original price
£25.15
Exc VAT
£30.18
Inc VAT
£30.18
-
£30.18
Current price
£30.18
Inc VAT
£30.18
-
£30.18
Exc VAT
Current price
£30.18
Exc VAT

Original price
£30.18
-
Original price
£30.18
Original price
£25.15
Exc VAT
£30.18
Inc VAT
£30.18
-
£30.18
Current price
£30.18
Inc VAT
£30.18
-
£30.18
Exc VAT
Current price
£30.18
Exc VAT
Ovia OBKV2-D-B 2W LED IP20 Maintained Self-Test Enable/Disable Hanging Exit Sign - Legend Down - 5500K - Black
Ovia
Availability:
IN STOCK
Ovia OBKV2-D-B 2W LED IP20 Maintained Self-Test Enable/Disable Hanging Exit Sign - Legend Down - 5500K - Black Product Description Data Sheet: Cli...
View full details
Original price
£30.18
-
Original price
£30.18
Original price
£25.15
Exc VAT
£30.18
Inc VAT
£30.18
-
£30.18
Current price
£30.18
Inc VAT
£30.18
-
£30.18
Exc VAT
Current price
£30.18
Exc VAT

Original price
£36.26
-
Original price
£36.26
Original price
£30.22
Exc VAT
£36.26
Inc VAT
£36.26
-
£36.26
Current price
£36.26
Inc VAT
£36.26
-
£36.26
Exc VAT
Current price
£36.26
Exc VAT
Ovia OBKS2-U-W 2W LED IP20 Maintained Self-Test Enable/Disable 5 In 1 Emergency Exit Sign - Legend Up - 5500K - White
Ovia
Availability:
Dispatch in 2-3 Days
Ovia OBKS2-U-W 2W LED IP20 Maintained Self-Test Enable/Disable 5 In 1 Emergency Exit Sign - Legend Up - 5500K - White Product Description Data She...
View full details
Original price
£36.26
-
Original price
£36.26
Original price
£30.22
Exc VAT
£36.26
Inc VAT
£36.26
-
£36.26
Current price
£36.26
Inc VAT
£36.26
-
£36.26
Exc VAT
Current price
£36.26
Exc VAT

Original price
£36.26
-
Original price
£36.26
Original price
£30.22
Exc VAT
£36.26
Inc VAT
£36.26
-
£36.26
Current price
£36.26
Inc VAT
£36.26
-
£36.26
Exc VAT
Current price
£36.26
Exc VAT
Ovia OBKS2-U-B 2W LED IP20 Maintained Self-Test Enable/Disable 5 In 1 Emergency Exit Sign - Legend Up - 5500K - Black
Ovia
Availability:
Dispatch in 2-3 Days
Ovia OBKS2-U-B 2W LED IP20 Maintained Self-Test Enable/Disable 5 In 1 Emergency Exit Sign - Legend Up - 5500K - Black Product Description Data She...
View full details
Original price
£36.26
-
Original price
£36.26
Original price
£30.22
Exc VAT
£36.26
Inc VAT
£36.26
-
£36.26
Current price
£36.26
Inc VAT
£36.26
-
£36.26
Exc VAT
Current price
£36.26
Exc VAT

Original price
£36.26
-
Original price
£36.26
Original price
£30.22
Exc VAT
£36.26
Inc VAT
£36.26
-
£36.26
Current price
£36.26
Inc VAT
£36.26
-
£36.26
Exc VAT
Current price
£36.26
Exc VAT
Ovia OBKS2-LR-W 2W LED IP20 Maintained Self-Test Enable/Disable 5 In 1 Emergency Exit Sign - Legend Left/Right - 5500K - White
Ovia
Availability:
Dispatch in 2-3 Days
Ovia OBKS2-LR-W 2W LED IP20 Maintained Self-Test Enable/Disable 5 In 1 Emergency Exit Sign - Legend Left/Right - 5500K - White Product Description ...
View full details
Original price
£36.26
-
Original price
£36.26
Original price
£30.22
Exc VAT
£36.26
Inc VAT
£36.26
-
£36.26
Current price
£36.26
Inc VAT
£36.26
-
£36.26
Exc VAT
Current price
£36.26
Exc VAT

Original price
£36.26
-
Original price
£36.26
Original price
£30.22
Exc VAT
£36.26
Inc VAT
£36.26
-
£36.26
Current price
£36.26
Inc VAT
£36.26
-
£36.26
Exc VAT
Current price
£36.26
Exc VAT
Ovia OBKS2-LR-B 2W LED IP20 Maintained Self-Test Enable/Disable 5 In 1 Emergency Exit Sign - Legend Left/Right - 5500K - Black
Ovia
Availability:
Dispatch in 2-3 Days
Ovia OBKS2-LR-B 2W LED IP20 Maintained Self-Test Enable/Disable 5 In 1 Emergency Exit Sign - Legend Left/Right - 5500K - Black Product Description ...
View full details
Original price
£36.26
-
Original price
£36.26
Original price
£30.22
Exc VAT
£36.26
Inc VAT
£36.26
-
£36.26
Current price
£36.26
Inc VAT
£36.26
-
£36.26
Exc VAT
Current price
£36.26
Exc VAT

Original price
£36.26
-
Original price
£36.26
Original price
£30.22
Exc VAT
£36.26
Inc VAT
£36.26
-
£36.26
Current price
£36.26
Inc VAT
£36.26
-
£36.26
Exc VAT
Current price
£36.26
Exc VAT
Ovia OBKS2-D-W 2W LED IP20 Maintained Self-Test Enable/Disable 5 In 1 Emergency Exit Sign - Legend Down - 5500K - White
Ovia
Availability:
Dispatch in 2-3 Days
Ovia OBKS2-D-W 2W LED IP20 Maintained Self-Test Enable/Disable 5 In 1 Emergency Exit Sign - Legend Down - 5500K - White Product Description Data S...
View full details
Original price
£36.26
-
Original price
£36.26
Original price
£30.22
Exc VAT
£36.26
Inc VAT
£36.26
-
£36.26
Current price
£36.26
Inc VAT
£36.26
-
£36.26
Exc VAT
Current price
£36.26
Exc VAT

Original price
£36.26
-
Original price
£36.26
Original price
£30.22
Exc VAT
£36.26
Inc VAT
£36.26
-
£36.26
Current price
£36.26
Inc VAT
£36.26
-
£36.26
Exc VAT
Current price
£36.26
Exc VAT
Ovia OBKS2-D-B 2W LED IP20 Maintained Self-Test Enable/Disable 5 In 1 Emergency Exit Sign - Legend Down - 5500K - Black
Ovia
Availability:
Dispatch in 2-3 Days
Ovia OBKS2-D-B 2W LED IP20 Maintained Self-Test Enable/Disable 5 In 1 Emergency Exit Sign - Legend Down - 5500K - Black Product Description Data S...
View full details
Original price
£36.26
-
Original price
£36.26
Original price
£30.22
Exc VAT
£36.26
Inc VAT
£36.26
-
£36.26
Current price
£36.26
Inc VAT
£36.26
-
£36.26
Exc VAT
Current price
£36.26
Exc VAT

Original price
£24.10
-
Original price
£24.10
Original price
£20.08
Exc VAT
£24.10
Inc VAT
£24.10
-
£24.10
Current price
£24.10
Inc VAT
£24.10
-
£24.10
Exc VAT
Current price
£24.10
Exc VAT
Ovia OBKC4-U-W 4W LED IP20 Maintained Self-Test Enable/Disable Emergency Sign - Legend Up - 5500K - White
Ovia
Availability:
Dispatch in 2-3 Days
Ovia OBKC4-U-W 4W LED IP20 Maintained Self-Test Enable/Disable Emergency Sign - Legend Up - 5500K - White Product Description Data Sheet: Click He...
View full details
Original price
£24.10
-
Original price
£24.10
Original price
£20.08
Exc VAT
£24.10
Inc VAT
£24.10
-
£24.10
Current price
£24.10
Inc VAT
£24.10
-
£24.10
Exc VAT
Current price
£24.10
Exc VAT

Original price
£24.10
-
Original price
£24.10
Original price
£20.08
Exc VAT
£24.10
Inc VAT
£24.10
-
£24.10
Current price
£24.10
Inc VAT
£24.10
-
£24.10
Exc VAT
Current price
£24.10
Exc VAT
Ovia OBKC4-U-B 4W LED IP20 Maintained Self-Test Enable/Disable Emergency Sign - Legend Up - 5500K - Black
Ovia
Availability:
Dispatch in 2-3 Days
Ovia OBKC4-U-B 4W LED IP20 Maintained Self-Test Enable/Disable Emergency Sign - Legend Up - 5500K - Black Product Description Data Sheet: Click He...
View full details
Original price
£24.10
-
Original price
£24.10
Original price
£20.08
Exc VAT
£24.10
Inc VAT
£24.10
-
£24.10
Current price
£24.10
Inc VAT
£24.10
-
£24.10
Exc VAT
Current price
£24.10
Exc VAT

Original price
£24.10
-
Original price
£24.10
Original price
£20.08
Exc VAT
£24.10
Inc VAT
£24.10
-
£24.10
Current price
£24.10
Inc VAT
£24.10
-
£24.10
Exc VAT
Current price
£24.10
Exc VAT
Ovia OBKC4-R-W 4W LED IP20 Maintained Self-Test Enable/Disable Emergency Sign - Legend Right - 5500K - White
Ovia
Availability:
Dispatch in 2-3 Days
Ovia OBKC4-R-W 4W LED IP20 Maintained Self-Test Enable/Disable Emergency Sign - Legend Right - 5500K - White Product Description Data Sheet: Click...
View full details
Original price
£24.10
-
Original price
£24.10
Original price
£20.08
Exc VAT
£24.10
Inc VAT
£24.10
-
£24.10
Current price
£24.10
Inc VAT
£24.10
-
£24.10
Exc VAT
Current price
£24.10
Exc VAT

Original price
£24.10
-
Original price
£24.10
Original price
£20.08
Exc VAT
£24.10
Inc VAT
£24.10
-
£24.10
Current price
£24.10
Inc VAT
£24.10
-
£24.10
Exc VAT
Current price
£24.10
Exc VAT
Ovia OBKC4-R-B 4W LED IP20 Maintained Self-Test Enable/Disable Emergency Sign - Legend Right - 5500K - Black
Ovia
Availability:
Dispatch in 2-3 Days
Ovia OBKC4-R-B 4W LED IP20 Maintained Self-Test Enable/Disable Emergency Sign - Legend Right - 5500K - Black Product Description Data Sheet: Click...
View full details
Original price
£24.10
-
Original price
£24.10
Original price
£20.08
Exc VAT
£24.10
Inc VAT
£24.10
-
£24.10
Current price
£24.10
Inc VAT
£24.10
-
£24.10
Exc VAT
Current price
£24.10
Exc VAT

Original price
£24.10
-
Original price
£24.10
Original price
£20.08
Exc VAT
£24.10
Inc VAT
£24.10
-
£24.10
Current price
£24.10
Inc VAT
£24.10
-
£24.10
Exc VAT
Current price
£24.10
Exc VAT
Ovia OBKC4-L-W 4W LED IP20 Maintained Self-Test Enable/Disable Emergency Sign - Legend Left - 5500K - White
Ovia
Availability:
Dispatch in 2-3 Days
Ovia OBKC4-L-W 4W LED IP20 Maintained Self-Test Enable/Disable Emergency Sign - Legend Left - 5500K - White Product Description Data Sheet: Click ...
View full details
Original price
£24.10
-
Original price
£24.10
Original price
£20.08
Exc VAT
£24.10
Inc VAT
£24.10
-
£24.10
Current price
£24.10
Inc VAT
£24.10
-
£24.10
Exc VAT
Current price
£24.10
Exc VAT

Original price
£24.10
-
Original price
£24.10
Original price
£20.08
Exc VAT
£24.10
Inc VAT
£24.10
-
£24.10
Current price
£24.10
Inc VAT
£24.10
-
£24.10
Exc VAT
Current price
£24.10
Exc VAT
Ovia OBKC4-L-B 4W LED IP20 Maintained Self-Test Enable/Disable Emergency Sign - Legend Left - 5500K - Black
Ovia
Availability:
Dispatch in 2-3 Days
Ovia OBKC4-L-B 4W LED IP20 Maintained Self-Test Enable/Disable Emergency Sign - Legend Left - 5500K - Black Product Description Data Sheet: Click ...
View full details
Original price
£24.10
-
Original price
£24.10
Original price
£20.08
Exc VAT
£24.10
Inc VAT
£24.10
-
£24.10
Current price
£24.10
Inc VAT
£24.10
-
£24.10
Exc VAT
Current price
£24.10
Exc VAT

Original price
£24.10
-
Original price
£24.10
Original price
£20.08
Exc VAT
£24.10
Inc VAT
£24.10
-
£24.10
Current price
£24.10
Inc VAT
£24.10
-
£24.10
Exc VAT
Current price
£24.10
Exc VAT
Ovia OBKC4-D-W 4W LED IP20 Maintained Self-Test Enable/Disable Emergency Sign - Legend Down - 5500K - White
Ovia
Availability:
Dispatch in 2-3 Days
Ovia OBKC4-D-W 4W LED IP20 Maintained Self-Test Enable/Disable Emergency Sign - Legend Down - 5500K - White Product Description Data Sheet: Click ...
View full details
Original price
£24.10
-
Original price
£24.10
Original price
£20.08
Exc VAT
£24.10
Inc VAT
£24.10
-
£24.10
Current price
£24.10
Inc VAT
£24.10
-
£24.10
Exc VAT
Current price
£24.10
Exc VAT

Original price
£24.10
-
Original price
£24.10
Original price
£20.08
Exc VAT
£24.10
Inc VAT
£24.10
-
£24.10
Current price
£24.10
Inc VAT
£24.10
-
£24.10
Exc VAT
Current price
£24.10
Exc VAT
Ovia OBKC4-D-B 4W LED IP20 Maintained Self-Test Enable/Disable Emergency Sign - Legend Down - 5500K - Black
Ovia
Availability:
Dispatch in 2-3 Days
Ovia OBKC4-D-B 4W LED IP20 Maintained Self-Test Enable/Disable Emergency Sign - Legend Down - 5500K - Black Product Description Data Sheet: Click ...
View full details
Original price
£24.10
-
Original price
£24.10
Original price
£20.08
Exc VAT
£24.10
Inc VAT
£24.10
-
£24.10
Current price
£24.10
Inc VAT
£24.10
-
£24.10
Exc VAT
Current price
£24.10
Exc VAT

Original price
£28.66
-
Original price
£28.66
Original price
£23.88
Exc VAT
£28.66
Inc VAT
£28.66
-
£28.66
Current price
£28.66
Inc VAT
£28.66
-
£28.66
Exc VAT
Current price
£28.66
Exc VAT
Ovia OBKE2-W 2W LED IP40 Maintained Emergency Self-Test Enable/Disable Exit Box - All 4 Legends Supplied - 6500K - White
Ovia
Availability:
IN STOCK
Ovia OBKE2-W 2W LED IP40 Maintained Emergency Self-Test Enable/Disable Exit Box - All 4 Legends Supplied - 6500K - White Product Description Data ...
View full details
Original price
£28.66
-
Original price
£28.66
Original price
£23.88
Exc VAT
£28.66
Inc VAT
£28.66
-
£28.66
Current price
£28.66
Inc VAT
£28.66
-
£28.66
Exc VAT
Current price
£28.66
Exc VAT

Original price
£28.66
-
Original price
£28.66
Original price
£23.88
Exc VAT
£28.66
Inc VAT
£28.66
-
£28.66
Current price
£28.66
Inc VAT
£28.66
-
£28.66
Exc VAT
Current price
£28.66
Exc VAT
Ovia OBKE2-B 2W LED IP40 Maintained Emergency Self-Test Enable/Disable Exit Box - All 4 Legends Supplied - 6500K - Black
Ovia
Availability:
Dispatch in 2-3 Days
Ovia OBKE2-B 2W LED IP40 Maintained Emergency Self-Test Enable/Disable Exit Box - All 4 Legends Supplied - 6500K - Black Product Description Data ...
View full details
Original price
£28.66
-
Original price
£28.66
Original price
£23.88
Exc VAT
£28.66
Inc VAT
£28.66
-
£28.66
Current price
£28.66
Inc VAT
£28.66
-
£28.66
Exc VAT
Current price
£28.66
Exc VAT

Original price
£40.82
-
Original price
£40.82
Original price
£34.02
Exc VAT
£40.82
Inc VAT
£40.82
-
£40.82
Current price
£40.82
Inc VAT
£40.82
-
£40.82
Exc VAT
Current price
£40.82
Exc VAT
Ovia OVEM11311WHRST 3W LED 3W LED IP20 Self-Test Maintained Emergency Exit Box- Right Legend - 6500K - White
Ovia
Availability:
Dispatch in 2-3 Days
Ovia OVEM11311WHRST 3W LED 3W LED IP20 Self-Test Maintained Emergency Exit Box - White - Right Legend Product Description Data Sheet: Click Here f...
View full details
Original price
£40.82
-
Original price
£40.82
Original price
£34.02
Exc VAT
£40.82
Inc VAT
£40.82
-
£40.82
Current price
£40.82
Inc VAT
£40.82
-
£40.82
Exc VAT
Current price
£40.82
Exc VAT

Original price
£40.82
-
Original price
£40.82
Original price
£34.02
Exc VAT
£40.82
Inc VAT
£40.82
-
£40.82
Current price
£40.82
Inc VAT
£40.82
-
£40.82
Exc VAT
Current price
£40.82
Exc VAT
Ovia OVEM11311WHLST 3W LED 3W LED IP20 Self-Test Maintained Emergency Exit Box- Left Legend - 6500K - White
Ovia
Availability:
Dispatch in 2-3 Days
Ovia OVEM11311WHLST 3W LED 3W LED IP20 Self-Test Maintained Emergency Exit Box - White - Left Legend Product Description Data Sheet: Click Here fo...
View full details
Original price
£40.82
-
Original price
£40.82
Original price
£34.02
Exc VAT
£40.82
Inc VAT
£40.82
-
£40.82
Current price
£40.82
Inc VAT
£40.82
-
£40.82
Exc VAT
Current price
£40.82
Exc VAT

Original price
£27.14
-
Original price
£27.14
Original price
£22.62
Exc VAT
£27.14
Inc VAT
£27.14
-
£27.14
Current price
£27.14
Inc VAT
£27.14
-
£27.14
Exc VAT
Current price
£27.14
Exc VAT
Ovia OBKV4-W 4W LED IP20 Maintained Self-Test Enable/Disable Emergency Exit Box - All 4 Legends- 5500K - White
Ovia
Availability:
Dispatch in 2-3 Days
Ovia OBKV4-W 4W LED IP20 Maintained Self-Test Enable/Disable Emergency Exit Box - All 4 Legends- 5500K - White Product Description Data Sheet: Cli...
View full details
Original price
£27.14
-
Original price
£27.14
Original price
£22.62
Exc VAT
£27.14
Inc VAT
£27.14
-
£27.14
Current price
£27.14
Inc VAT
£27.14
-
£27.14
Exc VAT
Current price
£27.14
Exc VAT

Original price
£27.14
-
Original price
£27.14
Original price
£22.62
Exc VAT
£27.14
Inc VAT
£27.14
-
£27.14
Current price
£27.14
Inc VAT
£27.14
-
£27.14
Exc VAT
Current price
£27.14
Exc VAT
Ovia OBKV4-B 4W LED IP20 Maintained Self-Test Enable/Disable Emergency Exit Box - All 4 Legends- 5500K - White
Ovia
Availability:
Dispatch in 2-3 Days
Ovia OBKV4-B 4W LED IP20 Maintained Self-Test Enable/Disable Emergency Exit Box - All 4 Legends- 5500K - White Product Description Data Sheet: Cli...
View full details
Original price
£27.14
-
Original price
£27.14
Original price
£22.62
Exc VAT
£27.14
Inc VAT
£27.14
-
£27.14
Current price
£27.14
Inc VAT
£27.14
-
£27.14
Exc VAT
Current price
£27.14
Exc VAT

Original price
£30.18
-
Original price
£30.18
Original price
£25.15
Exc VAT
£30.18
Inc VAT
£30.18
-
£30.18
Current price
£30.18
Inc VAT
£30.18
-
£30.18
Exc VAT
Current price
£30.18
Exc VAT
Ovia OBKH2-U-W 2W LED IP20 Maintained Self-Test Enable/Disable Emergency Exit Box - Legend Up - 5500K - White
Ovia
Availability:
Dispatch in 2-3 Days
Ovia OBKH2-U-W 2W LED IP20 Maintained Self-Test Enable/Disable Emergency Exit Box - Legend Up - 5500K - White Product Description Data Sheet: Clic...
View full details
Original price
£30.18
-
Original price
£30.18
Original price
£25.15
Exc VAT
£30.18
Inc VAT
£30.18
-
£30.18
Current price
£30.18
Inc VAT
£30.18
-
£30.18
Exc VAT
Current price
£30.18
Exc VAT